
Here's a pic of the stock Xs 1100 coils that are having some issues, so today I decided that after work I would put in the new coils that I got from
Mikes XS . They shipped very quickly and where exactly as advertised. So right when I got home at midnight (Swing Shift) I started the swap, all in all a pretty easy, considering they were for a 80-84 XS650's with Factory TCi ignition, however my understanding is that because the 650's were a two cylinders instead of four buying two of these coils works great, once you
bypass the ballast resistor, due to the new coils requiring right around 12volts, I also have heard that
opening the gap on the spark plug to about 0.35 is a pretty good idea. Don't worry I've done my research and that's what quite a few XS1100 owners are doing successfully.
Click here to see where I bought the coils It's
part # 17-6803. Mikes XS is very reasonable if you find a part there you probably wont find it any better or at a better price anywhere else!

Here's one of the old coils after I got it out, and surprise, surprise one of the wires leading to a mis-firing cylinder was broken internally.

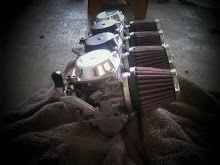
Here she is with the new coils installed and my new wires.

I'm not sure what I think about the wires? I don't know how long I'll keep them on there?
 Here's a pic of the stock Xs 1100 coils that are having some issues, so today I decided that after work I would put in the new coils that I got from Mikes XS . They shipped very quickly and where exactly as advertised. So right when I got home at midnight (Swing Shift) I started the swap, all in all a pretty easy, considering they were for a 80-84 XS650's with Factory TCi ignition, however my understanding is that because the 650's were a two cylinders instead of four buying two of these coils works great, once you bypass the ballast resistor, due to the new coils requiring right around 12volts, I also have heard that opening the gap on the spark plug to about 0.35 is a pretty good idea. Don't worry I've done my research and that's what quite a few XS1100 owners are doing successfully. Click here to see where I bought the coils It's part # 17-6803. Mikes XS is very reasonable if you find a part there you probably wont find it any better or at a better price anywhere else!
 Here's one of the old coils after I got it out, and surprise, surprise one of the wires leading to a mis-firing cylinder was broken internally.






keep em on there.
ReplyDeleteThey are starting to grow on me. Plus now it actually runs on all 4 cylinders so I can complain to much.
ReplyDelete"Shop"
Do you have any pics on bypassing the ballast resistor? Or tips on doing it. I just need to know which wires to disconnect/connect.
ReplyDeleteAnonymous Person,
ReplyDeleteI'm going to take a pic of that ballast resistor the next chance I get, but it's pretty easy, it's under the tank and there are two bullet connectors going to it. One is a male and the other female, just unplug the ballast resistor and plug them into each other. Good luck and I hope that it works out. Please email me using the form if this doesn't help.
"Shop"