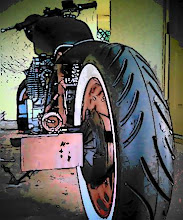
So the swing arm is done, and I put the wheel back on to see how the clearance is. It looks like I have plenty of room too!
 Here's another shot of the new added clearance.
 The next step is the hard tail mod! That means more cutting and welding... So the swing arm is done, and I put the wheel back on to see how the clearance is. It looks like I have plenty of room too!Here's another shot of the new added clearance.The next step is the hard tail mod! That means more cutting and welding...
  As described in the previous post the rear tire was rubbing on the swing arm due to the thicker 130/90-16 white wall tire. So as a quick fix and by the suggestion of the folks at XS11.com I cut a big chunk out of my swing arm. Big enough the the tire wont rub, but I can't leave it like that...
 So in comes the thin sheet metal patch, patterned out of the piece of cardboard shown in the previous post (click here if you missed that post). The cardboard helped in the making of the metal patch, knowing exactly what size it needed to be, and where the 90 degree bend should go.
 Here's another view of the patch!
 This is after I welded it on and ground it down.
 After welding it on I like to use a "secret sealer" just in case there's any invisible pin holes.
 Another view.
 While I was painting the swing arm I decided that the Final Drive could use a little paint too.
 So after a little cleaning scuffing and priming it got the juice.
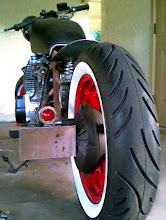
 The title says it all, I got the tires and rims on and realized that the rear wheel, although the recommended size of 130/90-16 was rubbing on the swing arm... Lots more work!
 If you look real close or click on the picture you can almost see what I'm about to do. Or just scroll down.
 Well the Swing arm is off. Note the hammer, I once heard that, "There is NO mechanical problem that cannot be solved with brutal force and ignorance!" Maybe I just need a bigger hammer?
 I took this picture so I could remember someday what it looked like before I start chopping and hard tailing.
 Well now she shouldn't rub! A little grinding and a inconspicuous patch and she'll be good as new!
 Here's the chunk that I cut out!
 I assembled it to make sure it won't rub, I think that I'll cut off a little more!
 It's all cut and not going to rub so I made a ghetto pattern out of cardboard that should make it easier to create my patch out of some thin sheet metal. Then I'll weld it on and paint it up, but I'll save that for another day!
 Here's a pic of the stock Xs 1100 coils that are having some issues, so today I decided that after work I would put in the new coils that I got from Mikes XS . They shipped very quickly and where exactly as advertised. So right when I got home at midnight (Swing Shift) I started the swap, all in all a pretty easy, considering they were for a 80-84 XS650's with Factory TCi ignition, however my understanding is that because the 650's were a two cylinders instead of four buying two of these coils works great, once you bypass the ballast resistor, due to the new coils requiring right around 12volts, I also have heard that opening the gap on the spark plug to about 0.35 is a pretty good idea. Don't worry I've done my research and that's what quite a few XS1100 owners are doing successfully. Click here to see where I bought the coils It's part # 17-6803. Mikes XS is very reasonable if you find a part there you probably wont find it any better or at a better price anywhere else!
 Here's one of the old coils after I got it out, and surprise, surprise one of the wires leading to a mis-firing cylinder was broken internally.
 Here she is with the new coils installed and my new wires.
 I'm not sure what I think about the wires? I don't know how long I'll keep them on there?
 So if you are looking for plugs for a 79 xs1100, here you go click here for brands and part numbers , I'm using NGK part # BP6ES , a lot of guys are using NGK part # BPR6EIX they are Iridium plugs and I've only heard good things about them.
 Today I got my coils that I ordered from Mikes Xs, Part #17-6803, and they look great, as referred by the good folks at xs11.com. Mikes has been a very reputable company and I would take my business there any day, I'm looking forward searching for more parts on there site, (click the link above to see for yourself)! I also got my 7mm wires in the mail from The Hot Rod Company here's the (exact link to the wires) that fit nicely with the new coils, and look good with my NGK caps. Everything should be going on very soon!
 This little guy was a nightmare, three of the four bearings were easy to find but this one?... For some reason Yamaha discontinued it (part # NA 5904 V1) and there isn't anything out there I looked and looked, until a local shop was able to order one, however a week later they gave me a call and let me know that the place they were ordering it from also didn't have it. I even tried Bearing suppliers using the part number and also the demensions 20 x 37 x 23mm (Id x od x width)
 Here's why I couldn't use that bearing there were deep groves in the roller portion of the bearing, and when rolled it sounded like a ratchet. A local shop here in town said that they would re use it and as result I will avoid going there in the future at all cost.
 Today I gave up on the right rear bearing, I had another wheel and the bearing in it was good so I used it. I do have one on the way from the Netherlands but I really think its only a matter of time before they send me a email letting me know that its not available.
 The front rotors took some serious coaxing, they were some places that shouldn't have been powder coated, so it took a lot, and a long time to get stuff to work, but it takes longer to do a job right when somebody esle didn't take the time to do it in the first place... "If a job is worth doing it's worth doing right!"

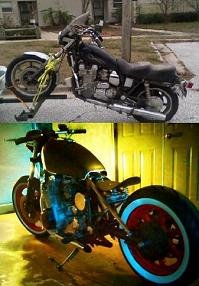
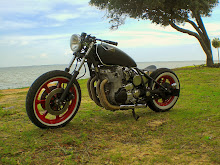
 Its starting to look like a Bobber, I started this morning at 10am and got to here at midnight.
  Today I added this trim to the tank, I'm not sure what I think of it yet, please let me know by commenting (located just below this post). My last wheel bearing should be in today or tomorrow, so the wheels should be going on soon! I hope? Then let the chopping begin!

 (Dent 2) This was my other major dent that came from the move to our new place, it took a while to get it all sanded out but it ready for filler know.
 Dent 2 filled and sanded
 Dent 1 was the worst but it came around.
 Everything is sanded smooth and ready for paint!
 Shot of Dent 2 ready for paint.
 To bad it drys flat.
 Today was Saturday and I decided to finish cleaning out my gas tank. I had started on Day 13 but had gotten very discouraged due to a ridiculous amount of rust inside the tank. I was even debating purchasing another tank online but the average cost for what I needed was in the three hundred dollar range so I looked around and found a guy that would acid wash mine for $250, still to pricey for me. S0 I did it myself for right around $25. I used some Stuff that I'd seen a commercial called CLR and it worked better then I could have ever imagined. I filled the tank about half way and let it soak for most of the day sloshing it inside the tank every now and then .
 I wish that I had taken a before pic! When I checked the tank after the soak I noticed there was a mark that was revealed once the rust was gone. I hadn't seen it before because the rust was so thick. However I still need to drain out the sludge that is sitting at the bottom of the tank.
 The CLR is originally a light green clear liquid, now its a thick brown goo, that wont drain out the fuel shutoff valve, so both valves on the tank also had to be removed, and why they're off I guess I'll re-build them too.
 Cleaned, rebuilt, and almost ready to go back in the tank once the goo stops draining out.
 Here she is with gas after the day of cleaning, the gas is not orange and there's no rust!
 Some of my Carburetor brackets have started rusting too... CLR to save the day!
 Very Rusty.
 After being stripped with CLR and painted, as you can tell I'm a huge fan.